Contents
Introduction
Blot is my own implementation of genetic images; it is a program for creating images and animation using interactive artificial evolution techniques.
Blot has a few differences from most other implementations of genetic images:
- Multi-threaded rendering support
- Animation support, with Improved blending techniques
- Support for large, high-quality images suitable for high-end printing.
Copyright Notice
All software contained herein is Copyright 2007 David A. Hart,
except where otherwise noted.
License
This program is free software; you can redistribute it and/or modify
it under the terms of the GNU General Public License as published
by the Free Software Foundation; either version 2 of the License, or
(at your option) any later version.
This program is distributed in the hope that it will be useful, but
WITHOUT ANY WARRANTY; without even the implied warranty of
MERCHANTABILITY or FITNESS FOR A PARTICULAR PURPOSE. See the GNU
General Public License for more details.
You should have received a copy of the GNU General Public License
along with this program; if not, write to the Free Software
Foundation, Inc., 51 Franklin St, Fifth Floor, Boston, MA 02110-1301
USA
http://www.gnu.org/licenses/gpl.html
Contact Info
email:
web sites:
Getting Blot
The Blot source is currently available directly via direct read access to the subversion repository. Compiled release packages are coming soon...
This command will download the Blot source code:
svn co https://blot.svn.sourceforge.net/svnroot/blot/trunk blot
More information is available here.
Building Blot
This build process creates the following executables:
- bin/app/blot-glut/blot-glut - image evolver & function grapher
- bin/app/math/math - command line function eval
CMake is used to aid a platform independent configuration.
http://www.cmake.org/
Note- the build examples below try to keep build files completely
separated from code. However, be aware that the parser files
generated by fnscanner.l and fnparser.y (named fnscanner.cpp,
fnparser.cpp & fnparser.output) land in the code tree rather than the
build tree.
Building under macosx
I used macports (http://www.macports.org/) to install the following packages: cmake, zlib, tiff, jpeg, libpng
add something like these into your shell environment (e.g. ~/.zshrc):
export CPATH='/opt/local/include:/usr/X11R6/include'
export LIBRARY_PATH='/usr/X11R6/lib:/opt/local/lib'
export LD_LIBRARY_PATH='/usr/X11R6/lib:/opt/local/lib'
export CMAKE_INCLUDE_PATH=${CPATH}
export CMAKE_LIBRARY_PATH=${LIBRARY_PATH}
export CMAKE_VERBOSE_MAKEFILE=ON
Release build:
Extract blot into <dir>
cd <dir>
mkdir bin
cd bin
cmake -D CMAKE_BUILD_TYPE=Release ..
make
Debug build:
cd <dir>
mkdir debug
cd debug
cmake -D CMAKE_BUILD_TYPE=Debug -D CMAKE_VERBOSE_MAKEFILE=ON ..
make
Building under cygwin
- install cygwin (http://www.cygwin.com)
- install the following cygwin packages: bison, cmake, flex, g++, libjpeg-devel, libpng12-devel, libtiffxx-devel, make, opengl, zlib
Add something like these to your environment (e.g. ~/.zshrc):
export CMAKE_INCLUDE_PATH="/usr/include:/usr/include/w32api:/usr/X11R6/include"
export CMAKE_LIBRARY_PATH="/usr/lib:/usr/lib/w32api:/usr/X11R6/lib"
Release build:
Extract blot into <dir>
cd <dir>
mkdir bin
cd bin
cmake -D CMAKE_BUILD_TYPE=Release ..
make
  # if you get errors linking glut,
  # maybe uninstall freeglut and try again
Debug build:
cd <dir>
mkdir debug
cd debug
cmake -D CMAKE_BUILD_TYPE=Debug -D CMAKE_VERBOSE_MAKEFILE=ON ..
make
Running Blot
Where to get help:
Quickstart Guide
If you've already downloaded and compiled Blot, then here's the minimal set of things you need to know to start making pictures. Blot's interface is entirely keyboard driven, I've not gone out of the way to provide any convenient menus or dialogs of any kind. For this, I am truly sorry. But, if it's any consolation, it was really easy to write.
| blot-glut |
Typing 'blot-glut' in a shell runs Blot. |
| h |
Hitting the 'h' key in the blot window shows the list of interface commands. |
| mm |
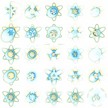
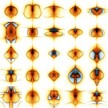
Typing 'mm' in the blot window mutates the current genotype, and displays a grid of mutation thumbnails. |
| double-click |
Double-clicking one of the thumbnails selects that one as the survivor and displays it. |
| single-click |
Single-clicking two different thumbnails selects both images for survival, and then mates them to produce 25 offspring. |
|
Repeat mutation & mating as long as you wish. |
| s |
Hitting the lowercase 's' key in the blot window at any time will save the current genotype or thumbnail view in the current directory. I usually hit 's' a lot. |
| S |
Hitting shift-'S' in the blot window at any time will render the current genotype to an image file. NB: Blot asks you for an image resolution in the shell window, not the Blot window. |
| u/d |
Most history is saved in memory as you play, hitting 'u' and 'd' will go up and down the stack of images you create. |
| Q |
Shift-'q' closes the Blot window and quits the program. |
Examples
- Evolving an image- a typical blot session
Since much of the design of Blot (or it's lack thereof) is a direct result of how I'm using the program daily, here's a description my own typical workflow. Take as much or as little of this as needed, YMMV.
- Starting Blot
I make a new directory for every Blot "session", because I save a lot of files while I'm evolving, and because it's easier for me to keep things organized by date with a directory for each day.
To make starting Blot easier, I added an alias 'sb' to my zsh startup files ('sb' stands for Start Blot). I also added ~/bin to my PATH environment variable, and put a sym-link named 'blot' in ~/bin which points to my release build of blot-glut.
With this setup, I start blot on a dual-core mac by opening a new terminal/shell window, and typing: > sb; ./blot -threads 2
- Changing colors
My color scheme is intentionally very simple, there are two colors, one for positive numbers and one for negative. The colors are multiplied by the magnitude of the expression, so very small numbers create dark colors, and very large numbers make bright colors. I usually leave the colors desaturated so that very bright colors turn white, it both looks nice and gives the impression of using more than two colors. By default, negative is blue and positive is red.
The RGB channels of positive colors are assigned to keys 5, 6 and 7, and negative colors are assigned to 8, 9 and 0. Pressing a number will increase the value in its assigned color channel. Holding the shift key while pressing the number will decrease the respective color channel. So, for example, pressing 6 will make the positive color more green. Pressing shift-8 (or '*') will make the negative color less red.
The brightness of all the color channels can be increased or decreased at the same time by using the up and down arrow keys. Gamma can be increased or decreased by using the right and left arrow keys.
To reset color channels to their default value, press shift-'C'. To reset gamma use shift-'G', and to reset brightness shift-'E'. (The 'E' stands for exposure)
- Setting the mutation rate
The global mutation rate can be changed by hitting the two-key combo 'm<n>' where n is 1-9, 0, or '-'. Typing m1 to m5 sets absolute mutation rates from 1 to 32 in powers of two, and typing m6 to m- set relative mutation rates similarly from 1/32 to 1/1. The default mutation rate is relative- 1/4, meaning that when you perform any mutation operation, only 25% of the nodes in the genotype will be affected.
- Mutation & mating
To mutate a genotype, hit the two-key combo 'mm'. This will use a random combination of all the mutation types. To only mutate using a specific mutation type, first hit 'm' and then hit the letter corresponding to the mutation you want. [cvfwnaCh]
| c | mutate constants only
| | v | mutate variables only
| | f | mutate function nodes only (e.g. change operator types, etc.)
| | w | warp mutations
| | n | node2arg- (destructive) collapse subtrees to a single node
| | a | arg2node- (constructive) expand a single node into a random subtree
| | C | Copy- replace an existing subtree with a copy of some other subtree in the genotype
| | h | harmonic mutation- add a copy of a subtree onto itself at higher frequencies
|
Mating two genotypes can be performed by clicking on two different thumbnails from the selection screen, i.e. after mutating. The two genotypes will be mated randomly, producing another selection screen.
- Changing resolution
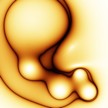
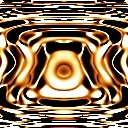
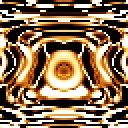
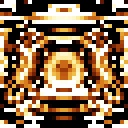
Blot starts in a low-resolution mode to make rendering very fast and interactive. As soon as your image has higher frequencies in it, the default resolution becomes too low to evaluate your images.
To change the display resolution at any time, use the keys shift-1, shift-2 and shift-3. These correspond to pixel blocks that are 1x1 (high res), 2x2 (medium res), and 4x4 (low res) respectively.
 |
 |
 |
| high: shift-1 (1x1) |
medium: shift-2 (2x2) |
low: shift-3 (4x4) |
- Saving
Hit 's' to save at any time. This will save two files into the directory that blot was started from: A .bfn file that contains the current genotype's expression, as well as color and view settings, and a .jpg thumbnail render of the genotype.
The save files are numbered automatically in the form ###.bfn and ###.jpg. The numbering starts at 001 and increases by 1 for every genotype that is saved.
- Rendering
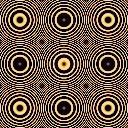
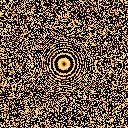
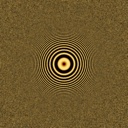
To interactively render a larger image of a genotype, hit shift-'S'. Blot will prompt for an image size, in the shell window. After entering the image size, e.g. 1000, Blot will prompt for the jitter setting. Enter 0 for no jittering, or 1 for jittering.
 |
 |
 |
| no jitter |
jitter |
jitter + resampling |
Jittering is used to trade aliasing in high-frequency regions (such
as jagged edges or moire patterns) for random noise. When such
artifacts are present, I usually render an image with jitter on, at
three or sometimes five times the final size I want, and then resize
the image to its final size using a high-quality filter
(e.g. Photoshop's "Bicubic"). For example, the first two images above
were rendered at 128x128. The third image was rendered at 640x640 and
then resized to 128x128 with a Mitchell filter.
- Graphing an expression
Blot started its life as a function plotter. To plot a one-dimensional function, include an expression which is a function of x on the Blot command line. If the expression is a function of y, then Blot is started in two-dimensional mode. Blot can switch back and forth interactively by pressing the '1' and '2' keys. The list of built-in function types can be seen by running Blot with the '-h' flag.
> blot "(sin(x)+sin(4*x))*exp(-x*x/16)*3"

- Defining new functions
The syntax for defining new functions looks like this: name(param {, param...} : body).
> blot "gauss(x:exp(-x*x)); gauss(x-3)+gauss(x)+gauss(x+3)"

- Seeding evolution with a specific expression
It is sometimes helpful, if you have a specific goal in mind, to build a basic structure for an image manually. To do this, start blot with an expression on the command line as described above, then evolve from there. You can also use this to initialize Blot with interesting basis functions, to make evolution faster or guide it in certain directions.
In this example, I start with three spots placed vaguely like eyes and a mouth to produce an alien face.
> blot "spot(x,y,cx,cy:sqrt(length(x-cx,y-cy)));
	spot(x,y,-1,1)*spot(x,y,1,1)*spot(x,y,0,-1)"
- Animating (blending) between two images
Animated blends between two images can be created either interactively or from the command line. There are three blending types, the most common of which is the "tree alignment" blend.
To blend the top two functions on the stack interactively, go to
the top image on the stack (using 'u') and then press 'T' for a
tree-alignment blend. (Alternatively 'B' for a "random" blend, or 'F'
for a "first-difference" blend.) The resulting blend is a new
function of variable t, where t ranges from zero to one. The blend is
displayed at t=0.5, which gives some indication whether the blend
animation will be interesting. Hit 's' to save the blend for later
rendering.
To render an animated sequence of thumbnails from a blend, press
'A'. You will be prompted for the number of frames to render, in the
shell window (not the blot window). After entering a number
(e.g. 20), blot will render a sequence of thumbnails. The animation
can be quickly previewed this way by opening the sequence using the
finder (macos) or explorer (windows), and flipping through the
thumbnails with your arrow keys.
To blend two functions on the command line, load both files with
the '-f' flag, and blend with the '-blend' flag. This will start blot
with the blended genotype as the top function on the stack. To render
the animation without opening the Blot window, use the '-anim
<frames>' flag. For example, I rendered the sequence pictured
above using the following command. The files listed here are provided
in the doc/images/prep directory.
[doc/images]
> blot -f prep/example_blend_first.bfn -f prep/example_blend_second.bfn \
-blend -anim 10 -res 192 192 -threads 2
I also resized the sequence of images like so.
(zsh syntax
w/ ImageMagick's "convert"
utility.)
> for f in 00?.jpg; convert -resize 33.33% -quality 95 $f $f:r_small.$f:e
- Rendering a high-res image, from the command line
To render an image from the command line, pass the '-o' flag with
the name of the output file. The file type is saved as the type
suggested by the filename's extension. Blot supports .jpg .tif .ppm
.hdr/.rgbe .tga .png.
> blot -f 001.bfn -o high_res.tif -res 2400 2400 -threads 2
The -threads flag should be used on a multi-processor and/or
multi-core machine, but using more than one thread on a
single-processor computer will slow Blot down instead of speeding it
up. The default number of threads is one.
- Using 'math'
The 'math' command line executable included with Blot was written
mainly to test the parser and expression language that Blot is based
on, but I also use it frequently when scripting as I don't know of any
other good, simple, infix command line expression calculators that are
included in most *nix distributions. (neither 'bc' nor 'dc' really
cut it. The shell (e.g. zsh) isn't that bad for arithmetic, but lacks
functions (e.g. sin())) Anyway...
> math "1.1 + 2"
3.1

> math "x=5; x * sin(2+3)"
-4.79462

> for f in {1,2,3}; math "3-$f"
2
1
0

> blot -f 001.bfn -o high_res.jpg -res `math "320*7"` `math "320*7"`
> convert -resize `math "100 * 1/7"`% high_res.jpg low_res.jpg
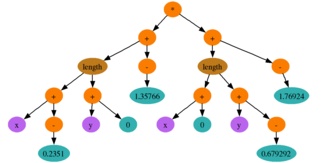
- Visualizing genotypes
A genotype's structure can be rendered directly by displaying the
tree-structured graph of nodes. Blot will
output GraphViz compatible "dot"
files, by passing the "-dot" flag to Blot. After GraphViz has been
installed, "dot" files can be rendered using the GraphViz command
"dot".
[doc/images]
> blot -f prep/example_blend_first.bfn -dot test.dot
> dot test.dot -Tjpg -otest.dot.jpg \
-Nstyle=filled -Nfontsize=24 -Nfontname=Times \
-Estyle=bold -Earrowsize=2 -Gnodesep=0.15
Command Line Parameters
> app/blot-glut/blot-glut -h


usage: app/blot-glut/blot-glut [-e] f(x[,y])
[-f filename.bfn]      load function from bfn file
[-res xres yres]       specify output resolution
[-window x0 x1 y0 y1]  specify window
[-ntiles a b]          specify how many tiles
[-tile a b]            specify which sub-tile to render
[-anim n]              save n frames of animation
[-animStart a]         start animation at frame a
[-animEnd b]           stop animation at frame b
[-dot filename.dot]    save dot file
[-p r g b]             positive color, default:0.90 0.17 0.02
[-n r g b]             negative color, default:0.02 0.17 0.90
[-gamma n]             gamma
[-exposure n]          exposure
[+j]                   use sample jittering
[-o filename]          save image without opening gui
[-save]                save bfn & thumb without opening gui
[-eval]                evaluate f(0) & print result
[-t n]                 set time to n
[-threads n]           use n render threads, default: 1
[-blend [type]]        blend top two functions on stack
                       type = align (default) | random | first
[-info align]          alignment info between top two funcs on stack
operators: + - * / < > & ^ | == ?:
functions:
    sin(x) asin(x) cos(x) acos(x) tan(x) exp(x) sqr(x) sqrt(x)
    ln(x) log(x) abs(x) floor(x) round(x) ceil(x)
    atan(x,y) pow(x,n) min(a,b) max(a,b) and(a,b) or(a,b) xor(a,b)
    length(x,y) distance(x1,y1,x2,y2)
    noise(x[,y[,z]]) turbulence(x[,y[,z]])
    lerp(t,x0,x1) smoothstep(t,x0,x1) linear(t,x0,x1[...]) bspline(t,x0,x1[...])
examples:
  conditional   (x<2?1:0)
  function def  h(x: (x<0?0:1)); s(x: h(x)*h(1-x)); s(x)
Interface Controls
Q           Quit
[12]        1d/2d mode
R           Reset window
<up/dn>     increase/decrease brightness
<rt/lt>     increase/decrease gamma
[567/890]   increase (neg / pos) rgb
            <shift> to decrease
[CBG]       reset Colors/Brightness/Bamma
[ud]        go Up/Down the stack
D           Delete function on top of stack
c           copy current function to top of stack
[olL]       'linearize' with offsets / factors / offsets & factors
r[rlf]      rotate: right, left, flip
x           expand vars & funcdefs to x & y
[vV]        create variable/funcdef out of current function
z           simplify current function

[!@#$]      cycle display res

alt-lmb     pan
ctrl-lmb    zoom

[sSP]       save: thumbnail / image / session
p           print current function to shell

m[m]        mutate current function
m[cvfwnaCh] mutate only:
              constants / variables / functions / warps
              node2arg / arg2node / CopyNode / harmonic
  In the mutate window, either click two functions to
  mate, or double-click one function to select and return
m[1234]     mutate [1 2 4 8] nodes
m[7890]     mutate [1/16 1/8 1/4 1/2] of all nodes
m[-]        mutate all nodes
M           mate two functions on top of stack
f           create random function

animation controls:
[TBF]       blend two functions on top of stack
            T=tree align B=random F=first diff.
A           render animation
t           cycle time (0, 0.5, 1.0)
m[tT]       mutate only:
              time / animTime
FAQ
- Where did the name "Blot" come from?
-
"Blot" is a portmanteau of Blender and Plot; plot because Blot started it's life as (and still is sometimes) a function grapher, and Blender because my personal library code is a random mix of unrelated classes. (Not to be confused with the real Blender). I also like Blot because it's short, and because everyone sees different things in Blot's images, so the allusion to Rorschach's Ink-blots seems apropos.
|
